Sunday, November 2, 2014

A Refashioned Halloween


Halloween turned out to be a busy season.  Costumes, costumes, costumes and face painting galore.  Three parties, and a bunch of happy little pumpkins.  It was a whirlwind amazing time, but...  I am tired.  

I had the best intentions of posting some tutorials, but all I have to offer are some random before and after photos.  Enjoy.


I found this button up at a local thrift store for $3. I turned it around and made a sleeveless tunic.  I then painted a pop art design with fabric markers.


Front.


Back.


The whole family.


A little robot.  I stitched on felt to a refashioned mens t-shirt and made the mask and head piece out of felt. The buttons were covered with aluminum foil.

***

A friend's daughter brought over her old costumes.


And I refashioned her a mermaid costume.  What a cutie!


We also dressed up for a Dias de los Muertos party.  I love sugar skulls.


Saturday, October 11, 2014

DIY Dias De Los Muertos Mask


Happy Fall!!  Oh how I miss it. Hawaii is an amazing place to live, but come October  I start to get homesick for some orange leaves and crisp air.  Nevertheless, the people in Hawaii know how to celebrate Halloween - one of my favorite Holidays!  In fact, we have quite a few parties/costumes to attend to this year.  One of which is a Dias de Los Muertos party.  

I don't like gory and super scary, but I do really appreciate the Day of the Dead masks and face painting.  For some reason, I think they are beautiful works of art.  My husband and I plan to paint our faces, but face paint for our son wouldn't last one hour.  So, I decided to make him a felt mask.


I began by using an old eye mask for a template.


I cut the straps off and traced it. 


I then began to sketch out the skeleton.


Once I got one side drawn, I cut it out and traced the other side. 


You can see that it took me a few sketches to get the shape I wanted.  Also, I cut out eyes.


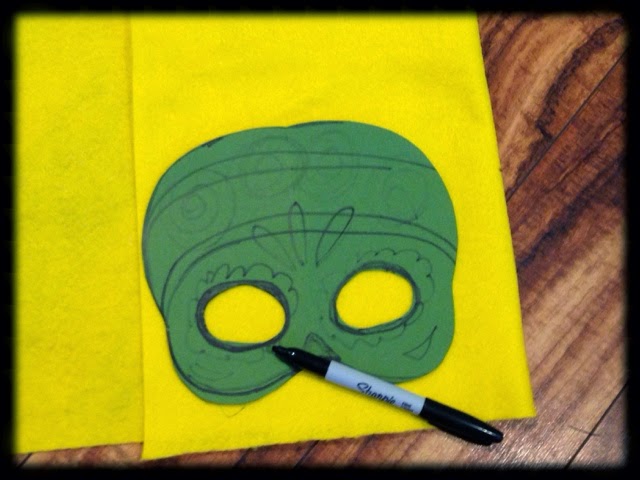
Here I sketched a decorative design so that I could get a sense of what I was going to create.


I then traced it onto yellow felt.


I cut two - front and back.


 Next, I traced the eyes onto black felt using a white colored pencil. 


I drew a trim around the eyes. 


For the blue flowers, I first traced the eye.


Then I drew a flower shape around the eye.


I used one to make the other one. 


Here we are so far. 


For some decoration, I cut out some drops in purple and orange and a little black skeleton nose.


Before stitching on all the decor, I put the front and back together with a strip of elastic in between. 


I zigzag stitched around the outside edges.  The elastic strip was sewn in between.


I made some felt roses and flowers, using this tutorial.  After I hand stitched the eye flowers, black eye pieces, and drops using a whip stitch, I hot glued the flowers on.  Later, I added gold seed beads to the inside of a few flowers.

My little guy loves his new mask.


Stay tuned for a few more Halloween tutorials.


Thursday, October 2, 2014

Polka Dot Period.


I'm calling this my polka dot period.  I can't stop making things with polka dots.  I made the above two dresses using a pattern.  Just can't get enough!  I love these two dresses so much...  


I can't say the same for this dress, however.  Yet, again I couldn't pass on the polka dots, and the stretchy fabric is perfect for a pencil skirt.


I cut the top off.  


And used my favorite Top Shop pencil skirt as a pattern.  


I thought I'd be extra crafty and make the top right side a little scrunchy.  So, I cut it a bit taller. 


Then, I pinned pleats and sewed over the top.


Hmmm....  I didn't plan so well because the back side ended up being higher than the top.  


Easy enough.  I just trimmed it up.  Next, I pinned the sides together and stitched each one. 


Lucky I have a serger.  I serged the sides up, and now it looks so professional : ).


I used an inch wide piece of elastic for the waistband. 


And I pinned it around the top.  


Loving this serger!!  I serged the elastic to the top of the skirt - on the wrong side.  If you don't have a serger, you could use a zigzag stitch.


When you flip it over, you have a nice elastic waistband. 


I stitched along the side seams to keep the waistband down.  Super easy. 


Ok...  So... The bottom didn't turn out exactly like I had planned. Neither did the side pleats add anything that obviously creative.  But all hope was not lost. 


I found a skinny piece of elastic and sewed it into the side of the skirt.  Sorry, I don't have photos.  I was so focused on making this work that I forgot to take a photo of the installation.  I was planning on "re-enacting" the photo with another piece of elastic, only to find out that I had no more. 
Here's a pretty good tutorial for sewing elastic. 


Nice and scrunchy.

***


Now I have a lovely pencil skirt to add to my growing polka dot fashion collection!